If you haven’t heard, today is the first day of the Coffee Lover’s Blog Hop!! If you’re unfamiliar with the Blog Hop, it is a quarterly blog hop that anyone can link up a card to. The only requirement is that you use coffee, tea, &/or cocoa related images and the theme this time is “Winter”. As always there are soo many great sponsors and a ton of giveaways and a lot of love is always given to your entries! The Craftin’ Desert Divas shop has a lot of digital stamps and stamp sets that will work so well for this theme, especially the “Ice Bear” image I am using today. I also happened to need a Get Well card (it’s that time of year when everyone is sick!!) so I decided to incorporate that into my card as well! Make sure you watch the video tutorial to see exactly how I made today’s card!!
ENJOY!
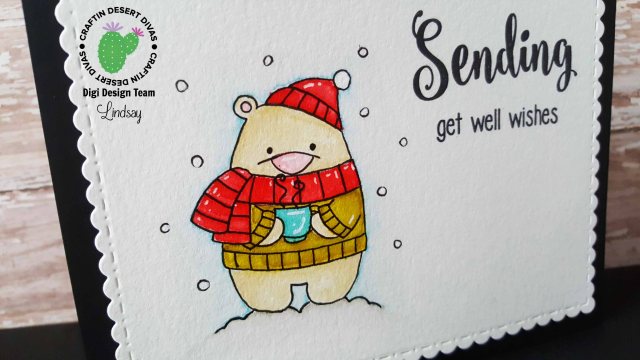
I started this card in Photoshop Elements. After bringing in the “Ice Bear” digital stamp to a new panel, I enlarged it slightly and then printed it off onto watercolor paper with NO crop marks. Before sending watercolor paper through your printer, you will want to make sure your printer can handle the thickness. I didn’t print crop marks with this panel because I wanted to do some die cutting with the “Fancy Frames” dies, but didn’t want the chance of the crop marks ending up on my die cut panel. After running the panel through my Big Shot I got to work on watercoloring. I used a mixture of Distress Markers and Distress Mini Ink Pads to do my watercolor. Because this is an overly clean and simple card, I did put quite a lot of time and energy into the coloring, adding two to three layers of color. Also, while watercoloring I did lose a lot of my printed lines, but that was an easy fix!
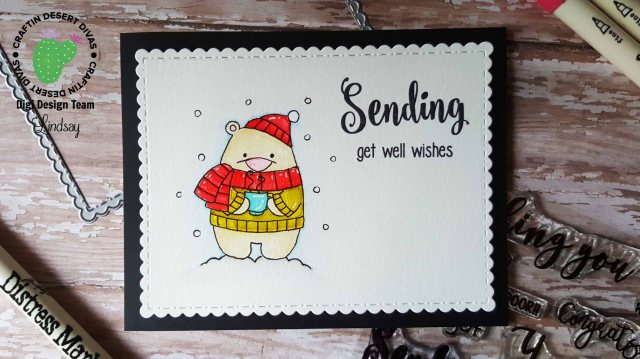
Because a laser printer requires heat to set the toner and watercolor is quite a lot thicker than your traditional paper, the toner does not set very well. In order to fix the now faint lines, I used a Micron pen to trace all the lines of the stamp. You could do this before coloring, as long as you use a black pen that will not bleed with your coloring medium, but I like to do it after to fix any bleed or little mistakes I might’ve had! Finally, to add a bit more interest I drew in a few little dots and lines with my white gel pen. I also coloring in each snowflake and the little pom on top of the bear’s hat to really whiten them up!
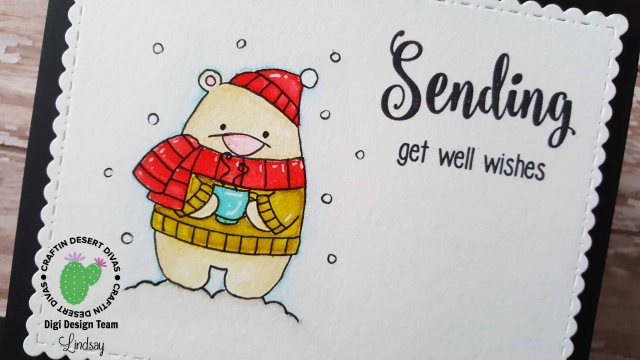
For my sentiment I used black dye ink and the “Wishful Thoughts” stamp set. These types of build your own sentiment sets are my absolute favorite! To help with placement I like to first stamp each different part on a piece of acetate and then I can play around with where I want to stamp each part, before making the commitment! I used my MISTI to stamp down the sentiment, once I had figured out the placement and finally started putting the card together. I mounted an A2 black cardstock panel on the front of an A2 white top folding card base and then the watercolor panel directly in the center with fun foam and double sided adhesive!
I hope you all enjoyed today’s video tutorial! If you haven’t already make sure to not only check out the Coffee Lover’s Blog Hop, but also go and take a peek at all the coffe/tea/cocoa inspired stamps that the CDD shop has to offer!!
If you’re interested in any of the products I used on today’s card, you can find them all linked below! (Affiliate links are used at no additional cost to you!) Thank you so much for stopping by today!! Happy Crafting!!


awwww…such a cutie pie. Love your coloring!
LikeLike
Such an adorable card!
LikeLike
Great card and sure to make anyone feel better when not feeling well.
LikeLike
So cute!
LikeLike
So cute, love the touch of black you added.
LikeLike
So cute!
LikeLike
adorable card!
LikeLike
Sweet get well card!
LikeLike
Such a sweet card!
LikeLike
Great CAS card and perfect for the Winter Coffee themed blog hop !
Imke ~ My Crafty Place
LikeLike
Such a sweet card that’s sure to cheer up any recipient.
LikeLike
So adorable! Love the soft colors …
LikeLike
This is just darling; gorgeous coloring!
LikeLike
I like the idea of using the image for a get well card.
LikeLike
What a sweet and adorable card. LOVE the sentiment too.
LikeLike
Such a CUTE card!!!!
LikeLike
Such a cute card. I love how you colored the image. I love the little highlights.
LikeLike
Oh my gosh, but this is just too adorable! Love the great highlights you added to your bear with your white gel pen!
LikeLike