Hello Everyone!! I am SO excited to be back with Joy Clair Stamps for another term on the oh so talented design team! Here are a few things about me, that you may or may not already know. I am a stay at home mom to two kiddos, ages 9 and 3, and we live in central Iowa. I have been crafting since I was a little girl and after my son was born I fell in love with stamping and cardmaking, which is my ME time. About two years ago, I started my blog and quickly moved into making videos. I find it so much easier to share my projects and the process through video tutorials (I’m not a great writer!), so that is where you will find MANY tutorials. I will also be continuing to upload to the Joy Clair YouTube, so be sure to subscribe to the company YouTube Channel!!
Our assignment for the introduction was to choose our favorite Joy Clair Stamp Set and use it. Pretty simple right? The only problem was, I have A LOT of favorites. So I went with a set that I haven’t used on my blog or any video yet and I also wanted to be sure that this card could be made with MINIMAL supplies. So whether you are an avid paper crafter and have a room full of supplies or just starting out and only have a few essential supplies, you can recreate this card! Also, if you aren’t a card maker at all and have no plans to start down this wormhole, these minimal supplies won’t break the bank if you need a few quick and easy teacher cards!! You can watch the full video tutorial below!!
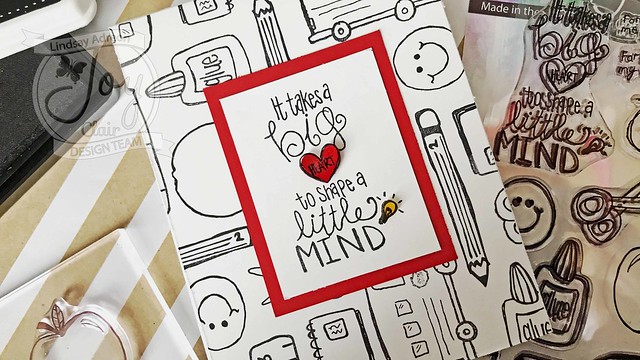
This card was made with minimal supplies, as I said above. All you need is the Joy Clair Back to School Stamp Set, black dye ink, cardstocks – white, red and yellow (watch the video tutorial for more options here), scissors (a paper trimmer is also helpful but not necessary, and adhesive ( I used Glossy Accents so I could embellish as well). All together, if you have to buy ALL of the supplies you shouldn’t spend more than $25 and that’s on more expensive products and no coupons!
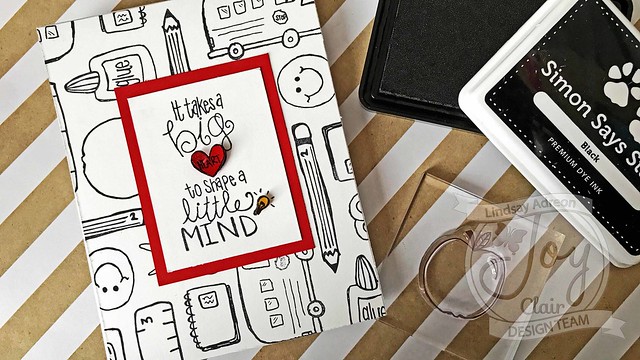
One of my favorite techniques to really get the most out of any one stamp set is to use the images to create your own patterned paper. That’s what I did on my card today. I stamped the images in black dye ink onto white card stock for a graphic look. If you wanted you could always color these images in, but I really like the black and white look.
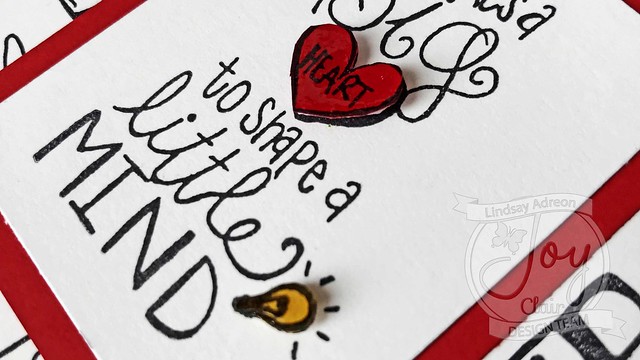
One “splurge” I took on this card was Glossy Accents. Now a small bottle of this is a few dollars, so it really isn’t that expensive, but you might be thinking that you could use any glue you already have on hand. And you definitely COULD use any glue, but the reason I chose this particular liquid glue is because I also used it to embellish my card. Glossy Accents is one of those multi use products that I couldn’t do without in my craft room. Not only is it a super strong and quick drying liquid glue, but it also can be put on top of die cuts or images for a nice domed shiny 3D finish. You can also just add drops around your card for a enamel dots look. I used the Glossy Accents on top of the light bulb and heart fussy cut images to really help them pop and look more like embellishments you would buy at the store.
I hope you all enjoyed today’s card and the video tutorial. Be sure to continuing stopping by to see this new design team’s amazing talents!! I am super excited to be a part of it and I will see you all next time!! Happy Crafting!!
* Affiliate Links Used

Nice card!
LikeLike
That’s a super lovely card ! Congratulations on your new term with Joy Clair !
[margessw(at)icloud(dot)com]
LikeLike